As the famous saying goes “Sometimes science is more art than science”; different game implementations will present mod authors with different sets of hoops they need to jump through in order to mod a game’s functionality. There’s no absolute right/wrong way to do it, but there are a few tools and methodologies that will make your life a whole lot easier.
Requirements
- Advanced knowledge of C#
- Basic knowledge of Unity3D’s MonoBehaviour functions
- Read the Harmony Lib wiki!
- A .NET decompiler of your choosing - ILSpy, dnSpy are both invaluable when reading the game’s assembly
- If modding a Unity game, identify the game’s engine version and install it, this step is especially important if the mod aims to load in new 3D models or other assets using Unity’s AssetBundles serializer/deserializer tools which are version specific! (Get your version here)
- Needless to say but we will anyway - make sure Vortex has a game extension to support the game you’re trying to mod, AND that it uses the harmony-patcher module
Recommended
- Basic understanding of the Common Intermediate Language (CIL/IL) and how IL instructions are converted to C# and vice-versa.
Most if not all C# modding journeys start by getting acquainted with the game assembly you’re trying to mod. Start up your .NET decompiler of choice and open up the game assembly you wish to mod and start reading the code to build an understanding of how the game forwards/processes information.
As part of this guide, we’ve been looking at the “Untitled Goose Game” which is a cool little game developed by an Australian games company called “House House”, the game has been developed using Unity3D. While reading through their code, we stumbled across a “CheatManager” class by mistake - this is a best case scenario where the game developer has already implemented some interesting functionality for us, we just have to enable it.

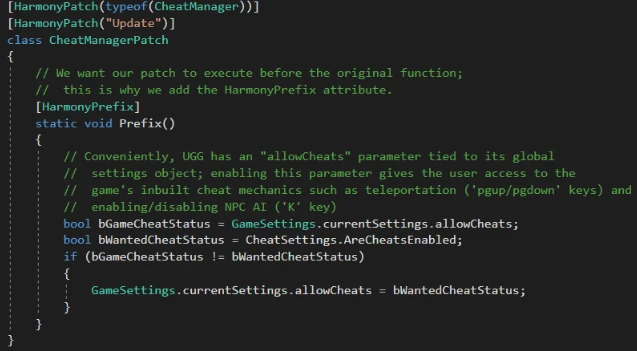
Even better - GameSettings is yet another singleton object so all we have to do is ensure that the allowCheats variable is set to true and the cheat functionality will be enabled. We can now proceed to plan out where we want to inject our mod - we’re going to keep it simple, without looking at the rest of the code we’re unsure whether this variable is checked/modified elsewhere, but we could create a prefix patch (Patching) right before the CheatManager’s Update method to ensure that allowCheats is always set to true right before the game verifies the variable.
Setting up the mod project
Technically we can set up the project’s location anywhere as long as it’s able to add all relevant libraries as references. When creating the project remember to create it as a C# .NET Class Library. By default we’re going to need to add the following references no matter what game we’re trying to mod:
- 0Harmony.dll - The patching library
- VortexHarmonyInstaller.dll - Vortex’s mod loader
- The game assembly we want to mod, in this case: Assembly-CSharp.dll
Given that this is a Unity3D game, we can use VIGO to give users the option to enable/disable the cheat mode directly from inside the game so we’re going to add several other libraries (including the Core UnityEngine libraries) we need:
- UnityEngine.dll - basic unity types
- UnityEngine.CoreModule.dll - basic unity types
- UnityEngine.IMGUIModule.dll - Unity’s Immediate GUI library used to draw our mod’s GUI implementation
- VortexUnity.dll - VIGO functionality
We start by creating a static method we want to use as the entry-point for the mod - “runPatch” in this case. Given that we’re developing this as a native Vortex mod, the mod type entry point invoker will always pass a VortexMod object to the entry-point.
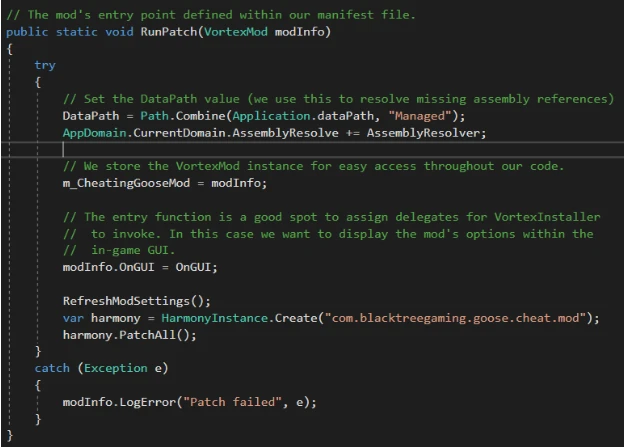
The entry-point method is basically the mod’s functionality setup area. This is the right location to initialize your mod and add subscribers to any delegates that the exposed mod type provides and most importantly, the right location to create a harmony instance to apply our patches, we simply call harmony.PatchAll() to allow Harmony to work its magic and automatically find any patches we had defined within our mod’s assembly. Note that we’re also statically storing the VortexMod object for easy access, and calling a “RefreshModSettings” method which attempts to deserialize this mod’s settings object, this object is also stored statically, but more on that later.
The patch itself is simple, we create a CheatManagerPatch class and annotate it so that Harmony knows we wish to inject our patch into the CheatManager::Update() method as a prefix patch; that will ensure that whatever code we write inside the Prefix() method will be executed before the original method executes.
We want the cheat mode state to be persistent and load up with the same value as we left it whenever we restart the game - in order to do that we need to create a settings object.
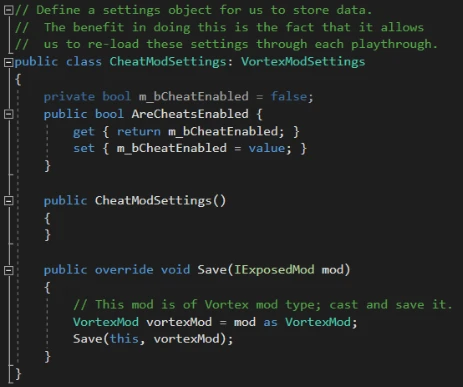
Ultimately it’s up to the mod author how he wishes to store and serialize/deserialize his mod’s settings. But for the best user experience we suggest using Vortex’s set of pre-defined, mod type specific settings classes which can easily be used to Load and Save the user’s selections. Simply create a new class which derives from the appropriate settings type, VortexModSettings in this case, define the custom options you wish to expose to the user and override the save function to use the correct exposed mod type.
We then ensure to load the settings object within the entry-point method and assign it to a static variable as mentioned when we were covering the entry-point code.

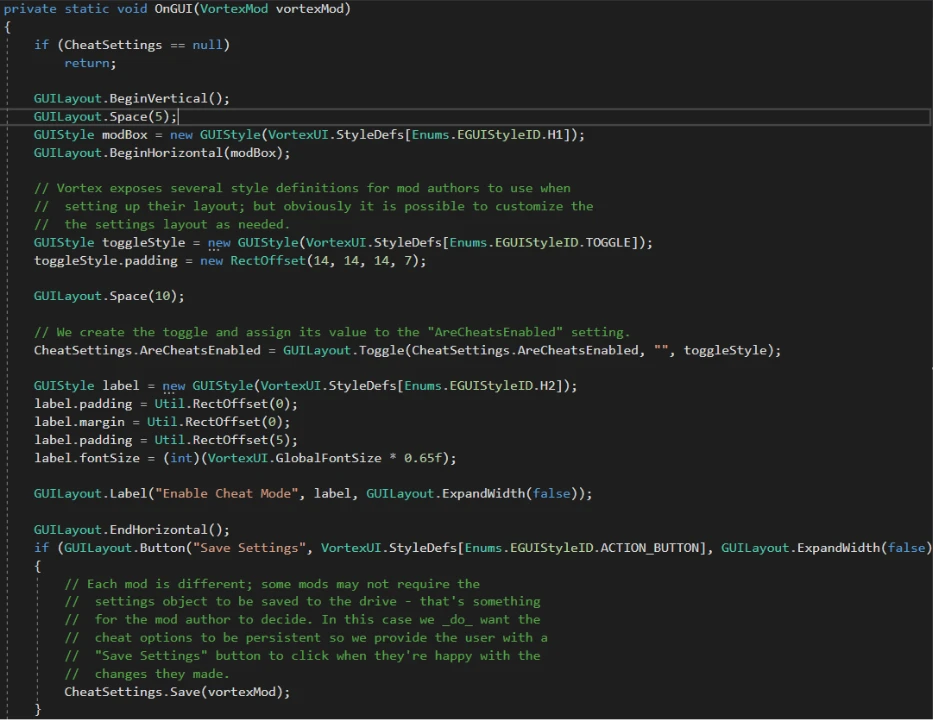
Finally, we write up the OnGUI function which we assigned as a subscriber to the mod’s OnGUI delegate function, this will cause our mod’s method to execute whenever it is selected inside VIGO.
Please note that the VortexUI class exposes several IMGUI style definitions which mods can use to style their controls to match VIGO’s theme. Obviously this is not required but does look better than the default Unity UI elements.
For the full code please have a look at https://github.com/IDCs/mod-cheatinggoose
Mod Manifest
As mentioned previously, a mod manifest must be provided in order for the mod loader to parse and load your mod. Different mod types will have their own mandatory fields - native Vortex mods are expected to define the below fields within their manifest file.
Note that the EntryPoint field expects the mod author to define the path to the entry method in the following format “Namespace.Classname::MethodName”, in this case however we did not specify a namespace so we simply use the class name which is CheatingGoose in this case.
{
   // Indicates whether this is a cheat mod.
    "IsCheat": true,
   // EntryPoint must follow the Namespace.Classname::MethodName format
    "EntryPoint": "CheatingGoose::RunPatch",
   // The mod's Id
    "Id": "CheatingGoose",
   // How it will be displayed within VIGO
    "DisplayName": "You're a cheating goose"
}
Asset Bundles (Unity3D)
Depending on the game engine that the game is developed in, there will be different methodologies the mod author will have to follow in order to load new assets into the game. When modding Unity3D games, we recommend using Unity’s Asset Bundle serializer/deserializer as it provides the ability not only to package up textures/3D models and audio; it can also package up any prefabs you may want to instantiate within the game.
That being said, please be aware that although asset bundles may allow the mod author to distribute C# scripts as Text objects, these are not compiled and will not function correctly at runtime when attached to existing gameobjects or any prefab you’ve added to your asset bundle. You can however, include these scripts in your mod’s assembly and then attach these to Unity gameobjects in one of your harmony patch methods.
First of all, In order for the game to successfully deserialize any asset bundle we may create, it’s important to create the bundle using the same version of Unity the game was built with. Easiest way to find out which version of Unity we need is to run the game at least once so it generates its output_log.txt file which is created automatically for each Unity game. Follow the below pattern to find the relevant log file. “C:\Users{YOUR_USERNAME}\AppData\LocalLow{GAME_COMPANY}{GAME_NAME}”.
For Untitled Goose Game, the log can be found in:
“C:\Users{USERNAME}\AppData\LocalLow\House House\Untitled Goose Game”; right at the top of the log file it should specify the Unity version as seen below.
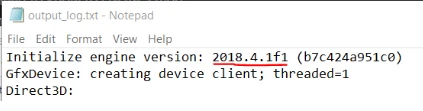
Please download the EXACT same version as the log specifies. Unity’s asset bundle deserializer will throw an exception upon encountering an asset bundle created with a different engine version and will not load your assets!
The asset bundles themselves are created from within Unity’s editor. The Unity3D developers explain how to create and load asset bundles better than we ever could in their documentation.
At this point this guide assumes that you have installed the correct Unity3D editor, have read the Unity documentation and have created your own Asset Bundle filled with goodies, the next step would be to load the asset bundle into the game from within one of the mod’s Harmony patches, the preferable location would be within one of the game’s awake or start monobehaviour methods but that may not always be possible, use your common sense to choose an appropriate location. E.g. if we were to want to replace a 3D model of a prop or NPC, we would try to find the class responsible for that prop/NPC and replace the gameobject’s mesh immediately before/after the object’s initialization.
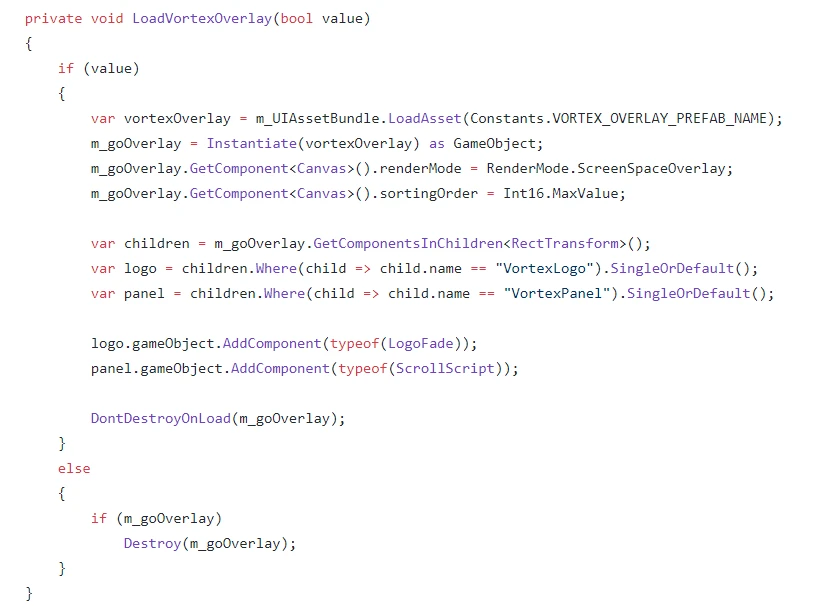
For your reference, Vortex’s In-Game Overlay is actually a prefab generated inside the Unity Editor. Note that we instantiate the prefab and then attach components to its children. (The attached components are compiled as part of our own assembly and are derived from Unity’s MonoBehaviour object)