Whether you’re developing an extension for Vortex or another tool, having your app automatically detect the install folder of a game can be incredibly useful and provides added convenience for your users. In this article we’ll discuss how to find the identifiers used by different game stores and use them to resolve the install folder.
Steam
Being the biggest game store on the internet, Steam game detection and IDs are well documented. Steam stores a lot of it’s metadata in .acf files. You may need a special parsing library to properly decode these.
You can find the Steam App ID of a particular game by using the Steam DB website. App IDs are numerical e.g. 12234. Remember, that some games may have multiple different editions on Steam which each have their own ID.
You can also find the app ID for the installed version of the game inside the .acf file under appid as shown below. This ID is also part of the filename e.g. appmanifest_629730.acf.
"AppState"
{
	"appid"		"629730"
	"Universe"		"1"
	"LauncherPath"		"C:\\Games\\Steam\\steam.exe"
	"name"		"Blade & Sorcery"
	"StateFlags"		"4"
	"installdir"		"Blade & Sorcery"
	"LastUpdated"		"1617782059"
	"UpdateResult"		"0"
	"SizeOnDisk"		"4984753993"
	"buildid"		"6492335"
	"LastOwner"		"76561198955614868"
	"BytesToDownload"		"928"
	"BytesDownloaded"		"928"
	"BytesToStage"		"1010"
	"BytesStaged"		"1010"
	"AutoUpdateBehavior"		"0"
	"AllowOtherDownloadsWhileRunning"		"0"
	"ScheduledAutoUpdate"		"0"
	"InstalledDepots"
	{
		"629731"
		{
			"manifest"		"6925824403051640329"
			"size"		"4984753993"
		}
	}
	"UserConfig"
	{
		"language"		"english"
		"betakey"		""
	}
}
As an additional method, the app ID is present in the URL of the Steam Store page for the game. So XCOM 2 can be found at
https://store.steampowered.com/app/268500/XCOM_2/and has an app ID of268500. {.is-info}
GOG
Similarly to Steam, GOG games have numerical IDs. You can usually find this information by using GOG DB, however, if you have the game installed the ID can also be extracted from the registry as one of the keys found under HKEY_LOCAL_MACHINE\SOFTWARE\WOW6432Node\GOG.com\Games.

You can use the same registry path to identify the install location. The numerical key will have a PATH attribute containing the folder path you require.
Epic Games
At the time of writing, there is no centralised database for game codenames used by the Epic Games Store. If you do not own the game on Epic, you’ll usually need to find someone who does to properly identify it. However, in some cases, the ID can be approximated by inspecting the network requests used by the webpage view of the store page for your desired game.
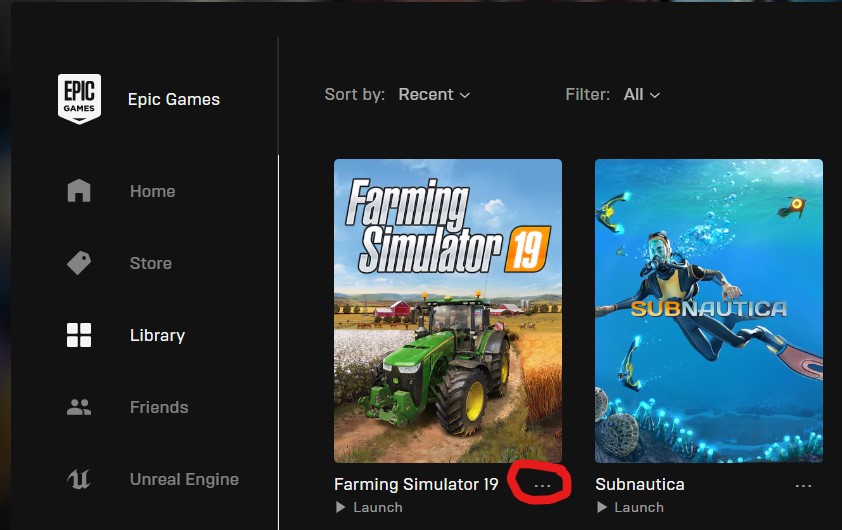
To find the ID for an installed game, first, open the menu under the game tile.
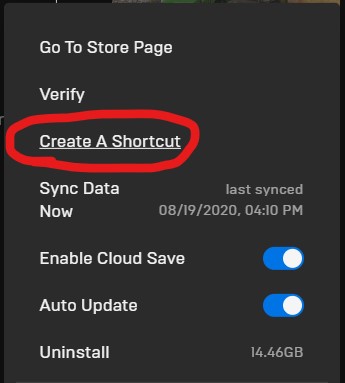
Then create a new shortcut. This will add an icon to your desktop.
Right click the icon and select “Properties”. Under the “URL” field you will find the app codename with in open command for the Epic Games Launcher. In this example, the codename is Stellula.
// Example of a basic shortcut URL (Appname: Stellula)
com.epicgames.launcher://apps/Stellula?action=launch&silent=true

// An example of a complex shortcut URL (Appname: b2e00fc16632475782a7730d1bd7cb60)
com.epicgames.launcher://apps/be886d9db65047a89b24cd4317695f18%3A5729e4a7132e4e078cec459b281dae8e%3Ab2e00fc16632475782a7730d1bd7cb60?action=launch&silent=true
Some Epic games will have a different shortcut which includes the
CatalogNamespaceandCatalogItemIdfor the game. These are usually separated with an URL-encoded semi-colon (:encoded as%3A). In this case, you should refer to the manifests (explained below) for the correct app ID. {.is-warning}

Once you know the game ID, you’ll be able to find the installation path front the Epic Games launcher manifests. To find where these are stored, you can check the AppDataPath key under HKEY_LOCAL_MACHINE\SOFTWARE\WOW6432Node\Epic Games\EpicGamesLauncher in the registry.
Inside the “Manifests” subfolder you’ll see a list of files with long coded file names and the file extension .ITEM. These are simply JSON files which contain data similar the to the example below.
{
	"FormatVersion": 0,
	"bIsIncompleteInstall": false,
	"AppVersionString": "1.7.1.0o Win",
	"LaunchCommand": "",
	"LaunchExecutable": "FarmingSimulator2019.exe",
	"ManifestLocation": "C:\\Games\\Epic\\FarmingSimulator19/.egstore",
	"bIsApplication": true,
	"bIsExecutable": true,
	"bIsManaged": false,
	"bNeedsValidation": false,
	"bRequiresAuth": true,
	"bCanRunOffline": true,
	"AppName": "Stellula",
	"BaseURLs": [
		"http://download.epicgames.com/Builds/Org/o-wt4zxeetmq6jem7qp4pkssr46aenj5/d8208b72c02e46f8814c653667f7db41/default",
		"http://download2.epicgames.com/Builds/Org/o-wt4zxeetmq6jem7qp4pkssr46aenj5/d8208b72c02e46f8814c653667f7db41/default",
		"http://download3.epicgames.com/Builds/Org/o-wt4zxeetmq6jem7qp4pkssr46aenj5/d8208b72c02e46f8814c653667f7db41/default",
		"http://download4.epicgames.com/Builds/Org/o-wt4zxeetmq6jem7qp4pkssr46aenj5/d8208b72c02e46f8814c653667f7db41/default",
		"http://epicgames-download1.akamaized.net/Builds/Org/o-wt4zxeetmq6jem7qp4pkssr46aenj5/d8208b72c02e46f8814c653667f7db41/default",
		"http://fastly-download.epicgames.com/Builds/Org/o-wt4zxeetmq6jem7qp4pkssr46aenj5/d8208b72c02e46f8814c653667f7db41/default"
	],
	"BuildLabel": "Live",
	"CatalogItemId": "f71268e4d1c144aea3cb30b7ab5a7b0e",
	"CatalogNamespace": "493e9ad801e8487497fe7840cb8404bb",
	"AppCategories": [
		"public",
		"games",
		"applications"
	],
	"ChunkDbs": [],
	"CompatibleApps": [],
	"DisplayName": "Farming Simulator 19",
	"FullAppName": "Stellula: Live",
	"InstallationGuid": "4B0F835C4D2BA35C675679874E1D05A5",
	"InstallLocation": "C:\\Games\\Epic\\FarmingSimulator19",
	"InstallSessionId": "01F224554D0A038CB9B95182777C49F6",
	"InstallTags": [],
	"InstallComponents": [],
	"HostInstallationGuid": "00000000000000000000000000000000",
	"PrereqIds": [],
	"StagingLocation": "C:\\Games\\Epic\\FarmingSimulator19/.egstore/bps",
	"TechnicalType": "public,games,applications",
	"VaultThumbnailUrl": "",
	"VaultTitleText": "",
	"InstallSize": 15528912033,
	"MainWindowProcessName": "",
	"ProcessNames": [],
	"MainGameAppName": "Stellula",
	"MandatoryAppFolderName": "FarmingSimulator19",
	"OwnershipToken": "false"
}
From the manifest we can confirm the game codename under AppName and the installation path under InstallLocation.
Origin/EA Play
Origin (or more recently, EA play) stores manifest files on your PC containing meta information about the installed games. This can be found under C:\ProgramData\Origin\LocalContent where you will find a named folder for each game. Inside each folder you will find several different files, the ones we are interested in are the .mfst files. These can be opened in a text editor.
?activerepair=0&autoresume=0&autostart=0&buildid=&contentversion=1¤tstate=kReadyToStart&ddinitialdownload=0&ddinstallalreadycompleted=0&dipInstallPath=&dipinstallpath=C%3a%5cGames%5cOrigin%5cCommand%20and%20Conquer%20Generals%20Zero%20Hour&downloaderversion=9.0.0.0&downloading=0&dynamicdownload=0&eula____installer_directx_eula_en_us_txt=2103371362&eula____installer_vc_vc2005sp1_eula_en_us_txt=602589686&eula____installer_vc_vc2010sp1_eula_en_us_rtf=774049465&eula__support_eula_en_us_eula_rtf=2269322523&eulasaccepted=1&gamemovedto=&id=OFB-EAST%3a52209&installdesktopshortcut=1&installerchanged=0&installstartmenushortcut=1&isitoflow=0&islocalsource=0&ispreload=0&isrepair=0&jobID=&jobid=%7bc1f40d67-c30a-488c-b8f5-cb5f50152aa8%7d&locale=en_US&movegameto=&moveorlocate=&optionalcomponentstoinstall=0&paused=0&previousstate=kCompleted&repairstate=&savedbytes=2290410931&stagedfilecount=0&totalbytes=3209029103&totaldownloadbytes=2290410931
This can be quite an intimidating block of text. What you are looking for specifically is the part that starts with &id=, so in the example above &id=OFB-EAST%3a52209. You may also realise that part of the ID is URL-encoded, so we need to convert %3a back into a colon. The resulting ID is OFB-EAST:52209.
If your game also includes DLCs, there may be a
.mfstfor each DLC too. Make sure you’re looking at the correct manifest. {.is-info}
Windows Store (Xbox)
With games installed with the Xbox app, it can be quite difficult to acquire the game ID. You will also find that unless the game specifically allows you to enable mods via the Xbox App you may not be able to mod it at all as you will not have permission to edit or even view the required files.
Enable Modding (if possible)
If your game supports modding, you’ll find an option in the context menu next to the play button to enable mods. Make sure you do this before attempting to track down the app manifest file, otherwise you won’t have permission to view it.

Extract the ID from the appmanifest.xml
Once you have mods enabled, you’ll be able to open the mods folder either from within on the Xbox app or by finding the game folder under C:\Program Files\ModifiableWindowsApps. Inside the game folder you’re looking for an appxmanifest.xml file similar to the example below.
<?xml version="1.0" encoding="UTF-8"?>
<Package xmlns:uap="http://schemas.microsoft.com/appx/manifest/uap/windows10" xmlns:desktop6="http://schemas.microsoft.com/appx/manifest/desktop/windows10/6" xmlns:desktop="http://schemas.microsoft.com/appx/manifest/desktop/windows10" xmlns:uap3="http://schemas.microsoft.com/appx/manifest/uap/windows10/3" xmlns:wincap="http://schemas.microsoft.com/appx/manifest/foundation/windows10/windowscapabilities" xmlns:rescap="http://schemas.microsoft.com/appx/manifest/foundation/windows10/restrictedcapabilities" IgnorableNamespaces="uap uap3 desktop desktop6 wincap rescap" xmlns="http://schemas.microsoft.com/appx/manifest/foundation/windows10">
  <Identity Name="VersusEvil.PillarsofEternity2-PC" Publisher="CN=AC6C8E65-87DD-4311-AFEA-997EC62C606E" Version="1.0.21.0" ProcessorArchitecture="x64" />
  <Properties>
    <DisplayName>Pillars of Eternity 2: Deadfire - PC</DisplayName>
    <PublisherDisplayName>Versus Evil, LLC.</PublisherDisplayName>
    <Logo>StoreLogo.png</Logo>
    <Description>Pillars of Eternity Description</Description>
  </Properties>
  <Dependencies>
    <TargetDeviceFamily Name="Windows.Desktop" MinVersion="10.0.18362.0" MaxVersionTested="10.0.18362.0" />
    <PackageDependency Name="Microsoft.VCLibs.120.00.UWPDesktop" MinVersion="12.0.40653.0" Publisher="CN=Microsoft Corporation, O=Microsoft Corporation, L=Redmond, S=Washington, C=US" />
    <PackageDependency Name="Microsoft.VCLibs.140.00.UWPDesktop" MinVersion="14.0.24217.0" Publisher="CN=Microsoft Corporation, O=Microsoft Corporation, L=Redmond, S=Washington, C=US" />
  </Dependencies>
  <Resources>
    <Resource Language="en-us" />
  </Resources>
  <Applications>
    <Application Id="App" Executable="PillarsOfEternity2.exe" EntryPoint="Windows.FullTrustApplication">
      <uap:VisualElements DisplayName="Pillars of Eternity II: Deadfire" Square150x150Logo="Logo.png" Square44x44Logo="SmallLogo.png" Description="Pillars of Eternity Description" ForegroundText="light" BackgroundColor="#000000">
        <uap:SplashScreen Image="SplashScreen.png" />
      </uap:VisualElements>
      <Extensions>
        <uap:Extension Category="windows.protocol">
          <uap:Protocol Name="ms-xbl-61fde0eb" />
        </uap:Extension>
      </Extensions>
    </Application>
  </Applications>
  <Extensions>
    <desktop6:Extension Category="windows.mutablePackageDirectories">
      <desktop6:MutablePackageDirectories>
        <desktop6:MutablePackageDirectory Target="PillarsofEternityIIDeadfire" />
      </desktop6:MutablePackageDirectories>
    </desktop6:Extension>
  </Extensions>
  <Capabilities>
    <Capability Name="internetClient" />
    <rescap:Capability Name="packageWriteRedirectionCompatibilityShim" />
    <rescap:Capability Name="runFullTrust" />
    <rescap:Capability Name="modifiableApp" />
  </Capabilities>
</Package>
In the example above, you can find the application ID and publisher ID under the Identity tag. So Pillars of Eternity 2 has an application ID of VersusEvil.PillarsofEternity2-PC and a publisher ID of N=AC6C8E65-87DD-4311-AFEA-997EC62C606E. In order to launch Xbox games through Vortex, you will need to ascertain the id of the game’s executable, luckily this information can be found in the appmanifest under the Application tag - you will need to look for the target executable, in this case PillarsOfEternity2.exe. Note in the data provided above that the application Id is App (this is generally the default id for most game executables but can differ from game to game)
The game ID required for Vortex to detect this game is VersusEvil.PillarsofEternity2-PC, and the app Id required to start the game is App.
import fs from 'fs-extra';
import { util } from 'vortex-api';
function findGame() {
  // The game store helper utility function will search for any provided Game Id
  // regardless of game store (unless a specific store id is specified)
  return util.GameStoreHelper.findByAppId([MS_APPID, STEAM_APPID])
    .then(disco => disco.gamePath);
}

async function requiresLauncher(gamePath) {
  // In order to run MS store games through Vortex - the MS game launcher MUST
  // be used. The purpose of this function is to confirm that the game is installed through
  // the MS store before trying to run the game through the launcher.

  // the windows store application has this silly permission system where we can't
  // even stat some of the files in the game directory, so if we can't stat the exe, it's a safe bet
  // we have to go through the MS launcher.

  // alternatively, if the game is set to allow mods and is installed in a custom location (as allowed by newer
  // versions of the MS store application) the game store is far less restrictive and it it's more reliable to try
  // to confirm the existence of the game's 'appxmanifest.xml' file. (executable will still have restrictions)
  try {
    // Try to confirm the existence of the game's executable.
    await fs.stat(path.join(gamePath, EXE_NAME))
  } catch (err) {
    // If we failed, given that this function can only be called if the game
    // has been successfully "discovered" - it's a fair assumption that the Xbox game store blocked us.
    // We can now try to launch the game through the xbox launcher as seen below. 'appExecName' parameter
    // refers to the executable id we picked up from the appmanifest earlier. FYI: since 'App' is the default
    // executable id for most Microsoft applications/games, the parameters property in this case can be
    // omitted entirely as the GameStoreHelper will default to 'App' when 'appExecName' is not provided.
    return {
        launcher: 'xbox',
        addInfo: {
          appId: MS_APPID,
          parameters: [
            { appExecName: 'App' },
          ],
        }
    };
  }
}

// The 'requiresLauncher' function needs to be added to the game registration
// function call as a property.
function main(context) {
context.registerGame({
      id: GAME_ID,
      requiresLauncher, // <- here it is.
      executable: () => EXE_NAME,
      requiredFiles: [
        EXE_NAME,
      ],
      // ... all other required game registration parameters have been omitted for demonstration purposes
    })
}
Getting the ID from the registry
Due to the way Windows Store games are managed by your system, if you can’t enable modding through the Xbox app, you may not be able to install mods correctly. {.is-warning}
Much of this section is taken from the research by the Wryebash team found here. {.is-info}
)
An alternative way to find the game ID is to use a tool like the Windows Registry Editor to dive into the registry keys for the Xbox app. Each game is considered a “package” as far as this data structure is concerned, so we’ll be using that term to refer to a game in this section.
Find the package full name.
Each Windows Store ID is made up of the publisher ID and the app ID which should be fairly easy to separate. These keys are found under HKEY_CLASSES_ROOT\Local Settings\Software\Microsoft\Windows\CurrentVersion\AppModel\Repository\Families\{package_name}.
The sub-key inside each of these package keys will correspond with a different build of the game.

Find the package index
Now we have the full package name, we need to find it’s “mutable location” but to get that, we first need to find it’s index. You can find this as a sub key under the full package name at HKEY_LOCAL_MACHINE\SOFTWARE\Microsoft\Windows\CurrentVersion\AppModel\StateRepository\Cache\Package\Index\PackageFullName\{full_name}.

Find the mutable location
Finally, to get the mutable location, you’ll need to use the index at look at HKEY_LOCAL_MACHINE\SOFTWARE\Microsoft\Windows\CurrentVersion\AppModel\StateRepository\Cache\Package\Data\{index}\MutableLocation

Generally, this will point to the location discussed in Extract the ID from the appmanifest.xml above.
Ubisoft Connect (UPlay)
Games from Ubisoft Connect can be identified from the system registry, similar to Xbox games.
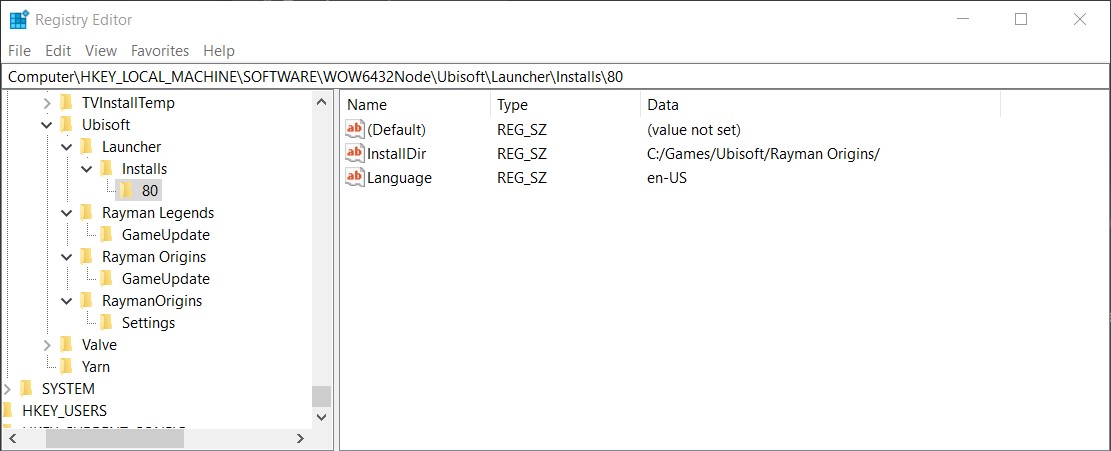
The installation path for each game can be found under the keys for each installed game at HKEY_LOCAL_MACHINE\SOFTWARE\WOW6432Node\Ubisoft\Launcher\Installs. Each numerical ID here is the ID of the game in question. You can work out which is which by the InstallDir subkey. In the example below, the game ID of Rayman Origins is 80.
For whatever reason, the install location does not include the game name. This can be found at HKEY_LOCAL_MACHINE\SOFTWARE\WOW6432Node\Microsoft\Windows\CurrentVersion\Uninstall\UPlay Install {id} under the DisplayName subkey.

Note that it doesn’t seem to be possible to get the executable name for the game programatically. {.is-info}
Amazon Games
As of Vortex 1.4.16, the automatic detection of Amazon Games installations is not currently supported. If you would like to add this feature please consider creating an extension. {.is-warning}
Games included with an Amazon Prime membership can be installed from the dedicated Amazon Games app. The metadata for these games is well organised into SQLite tables inside AppData. You will need a library to read SQLite tables, or to view it manuually you can use a tool like DB Browser for SQLite.
There are several tables and manifest files dotted around which include useful information such as game metadata and file hashes of all installed files, however the table we are interested in can be found at %localappdata%\Amazon Games\Data\Games\Sql\GameInstallInfo.sqlite. Each row in this table contains the ID, install location, name and more.
In this example we have the game “Blue Fire” installed via Amazon Games.

As you can see in the image above, the ID for this game is amzn1.adg.product.0d364464-032c-40c9-a6da-c633a53e3374 and the install directory is C:\Amazon Games\Library\Blue Fire.