Contents
The modding requirements of games can differ substantially, and therefore the logic behind the Vortex game extensions themselves will differ from extension to extension. There are however some common requirements, e.g. asking the user to install a mod loader/mod library on which other mods may be dependent. This document aims to demonstrate and explain certain Vortex API utility functions which may help 3rd party developers enhance their game extensions to improve user experience and/or cater to commonly encountered issues during development.
This guide assumes that its reader has followed the Creating a game extension guide and at the very least knows how to register a game extension and a custom installer.
Querying the user for input through the Vortex API dialog system
At times it may be required to ask the game extension user for input or direct him to set up his modding environment correctly. Vortex’s API dialog system can be used to accomplish this.
First of all, a short breakdown of the Vortex API showDialog function call.
| Property | Description |
| ———– | ———– |
| type| The dialog’s type - this changes the style of the dialog to inform the user of errors, information, etc. The type should be set to either of the next values success, info, error, question |
| title| Controls the header text displayed to the user, i.e. ‘Bukkit is Required’ |
| content | The content of the dialog - whether it’s checkboxes, input boxes, or just pure text, a breakdown of this property and how to define it will be explained a bit later |
| actions | An array of possible actions/buttons - Vortex will create a dialog button for each provided “action”, |
| id | This should be a unique string representative of what the dialog is attempting to achieve, i.e. Minecraft-bukkit-required-dialog |
function init(context) {
// You can't call api functionality directly inside the init function (the api isn't ready at that point)
// context.once is executed only 'once', after the API finished loading and it's therefore safe to show the dialog.
context.once(() => {
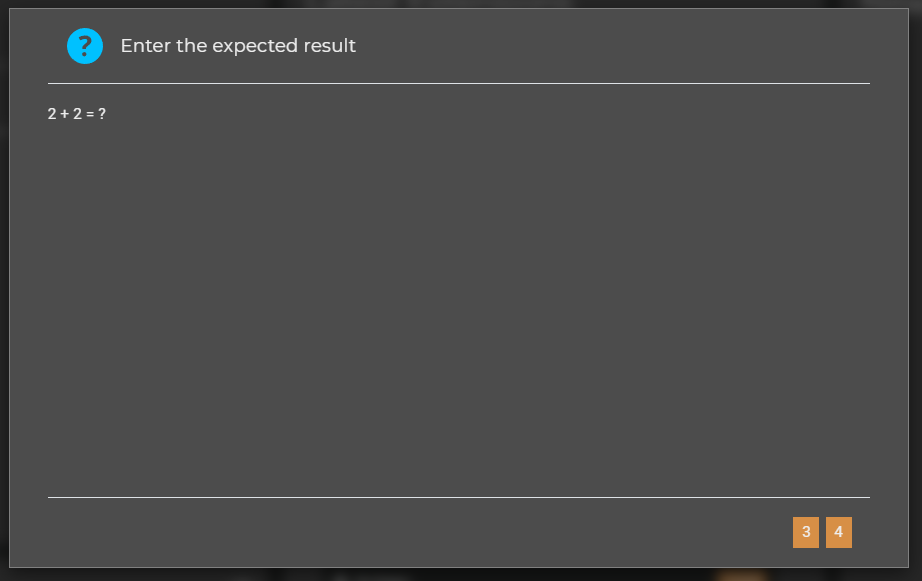
context.api.showDialog(
'question', // This is the type
'Enter the expected result', // This is the title
{ text: '2 + 2 = ?' }, // This is the content
[ { label: '3', default: true }, { label: '4' } ], // These are the actions
'this-is-the-dialog-id') // Dialog id
.then((result) => {
// Dialogs are asynchronous and can be used to block functionality (i.e. mod installation) until the user clicks a button.
if (result['action'] === '3') { // Notice we're using the label value to identify which button was pressed.
// Tell the user he's wrong.
} else {
// Tell the user he's right.
}
});
});
return true;
ℹ️ Note that the ‘3’ button has the default attribute set to true - this means that the dialog will choose the ‘3’ action/button if the user presses his ‘Enter’ key - this is an optional property, not providing a default action will ignore user key presses.
(More on the init function in our Creating a game extension guide
The resulting dialog will appear on Vortex startup as we’re displaying it inside the context. once function
As mentioned some games may require a mod loader or a mod library for mods to be loaded into the game correctly. It’s common practice to inform the users of any such dependencies during the game registration’s setup stage. We’ve already covered the basics required to do this in the above dialog, we simply need to modify the code a bit.
const path = require('path');
const { fs, util } = require('vortex-api');

function prepareForModding(api, discovery) {
  return api.showDialog(
    'question', // type
    'Some Mod Loader is Needed', // title
    { text: 'This game requires a mod loader for mods to function correctly, please download the mod loader using the buttons below' }, // content
    [ { label: 'Download', default: true }, { label: 'Close' } ]) // Actions
    .then((result) => {
      // We don't actually download the dependency for them, we just
      //  open up an external browser with the proper url so they can download it manually
      //  from there.
      return (result['action'] === 'Download')
        ? util.opn('www.someWebsite.com')
        : Promise.reject(new util.UserCanceled());
    })
    // Below code will only run if the user chooses to download the mod loader.
    //  Given that we return a rejected promise if the user chooses not to download the
    //  mod loader, the game extension will not load. We could just return a resolved promise
    //  instead and allow the user to manage the game in Vortex even without the mod loader.
    .then(() => fs.ensureDirAsync(path.join(discovery.path, MODS_PATH)));
}

function init(context) {
  context.registerGame({
    ...
    // Omitted all other required game properties as we only want to
    //  touch upon the setup stage of the game extension which is run
    //  whenever the game mode is activated within Vortex.
    //
    // The setup callback will provide the game extension with the
    //  game's discovery information (game path, tools, etc)
    //  but in order to show the dialog in the game's setup stage we will
    //  need to forward the api object to the extension function that
    //  deals with the setup, in this case we called it 'prepareForModding'.
    setup: (discovery) => prepareForModding(context.api, discovery),
  });

  return true;
}

module.exports = {
  default: init
};
So far we’ve been displaying basic text to the user, in some cases, this may not be sufficient. The dialog content object can be used to display information and take input from the user in various combinations:
| Property | Description |
|---|---|
| text | This is what we’ve used so far - it will display regular wrapped text, the text is not selectable, scrollable, and does not maintain any kind of predefined line breaks - this is useful for very basic informational dialogs |
| message | Regular text placed inside a textbox that is scrollable and selectable - whether the text wraps is determined by the options.wrap property (more on dialog options further down) |
| bbcode | BBCode is a lightweight markup language, used primarily on forums - it’s used to format the text that is displayed to the user. More on how to use BBCode here |
| checkboxes | An input type that will allow the user to “check/tick” certain functionality to select something (e.g. select which mod files to install) the user can check/tick multiple checkboxes |
| choices | (AKA Radioboxes) Similar to checkboxes, but only one box/circle can be selected at one time |
| input | Can be used to display one or more input boxes for the user to type information in. |
| options | The options object can be used to format and order your dialog’s content. options. wrap: true for example will ensure that the message text box is wrapping the text. options. translated: true will attempt to translate the message depending on the user’s localization options. options. order: ['checkboxes', 'text'] ensures that checkboxes are displayed above any text message (which is provided by the text property above) |
| condition | A function that receives the defined dialog content as a parameter and can be used to validate the dialog’s input controls and if necessary disable the dialog’s buttons until the user fixes his input (e.g. block the user from continuing if an input field is empty) more on this later. |
As mentioned above, the dialog content properties can be used in combination with each other; which means you can have text, message, checkboxes, and input boxes all on the same dialog if needed.
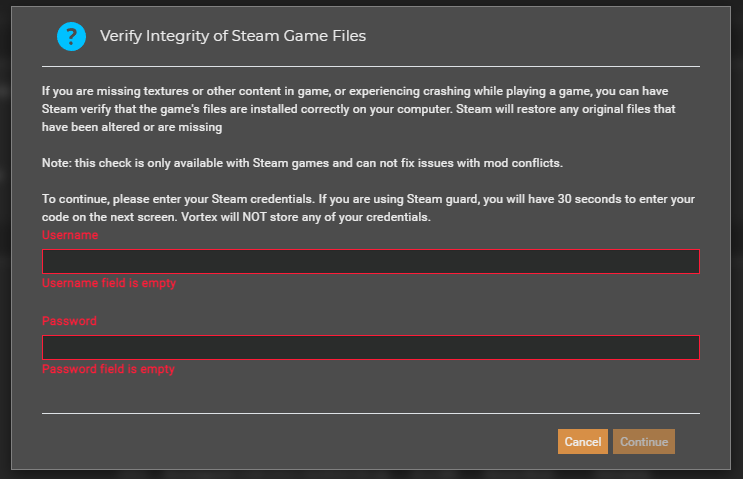
To demonstrate how to access the user’s input field data and validate his input - please consider the below dialog where we attempt to query the user for a username and password (lets pretend it’s required to access some sort of API or website)
api.showDialog('question', 'Authentication Required, {
      text: 'Please provide a username and password'
      input: [
        { id: 'Username', type: 'text', label: 'Username' },
        { id: 'Password', type: 'password', label: 'Password' },
      ],
      condition: (content) => {
       // Loop through the input fields and make sure the user
       //  provided a value.
        const errors = content.input.map((inp) => {
          if (!inp.value) {
            return {
              actions: ['Continue'], // The action/button we want to disable
              errorText: `${inp.label} field is empty`, // Tell the user what went wrong
              id: inp.id, // this needs to be the id of the input so that Vortex highlights it as invalid
            };
          } else {
            return undefined;
          }
        }).filter(err => err !== undefined);
        return errors;
      }
    }, [
      { label: 'Cancel' },
      { label: 'Continue', default: true },
    ]).then(res => {
      if (res.action === 'Cancel') {
        return Promise.reject(new util.UserCanceled());
      } else {
          // access the username input field value
          res.input['Username'];
          // access the password input field value
          res.input['Password'];
      }
    })
A simple example of this functionality is used in the Steam file downloader extension.
7Zip module usage
The aim of this topic is to explain how to use the 7Zip module included as a utility feature in Vortex’s API.
Some games require their mods to be placed in a .zip/.7z format within a certain directory for the game to load the mod (e.g. DOOM and Farming Simulator games). Vortex will by default extract the archive of any mod that is being installed to ascertain its mod type and potentially change the mod’s structure to better fit the game’s requirement; it will not however repack the archive.
So far the community for these games have been using a pattern called “double-zipping” so that Vortex installs the mod as a zip directly. Although this is a viable option, it limits Vortex’s installation capabilities, and will not support single-zipped mods.
An alternative solution to this problem would be to re-pack the archive within a custom installer; for brevity’s sake we’re going to look at the installer itself and forgo the regular game registration, etc.
const Bluebird = require('bluebird');
const { util } = require('vortex-api');

async function installZipContent(files, destinationPath) {
    // first of all we need to cater for any double-zipped files. They're technically already in a format that
    // the game supports so we can just install those files as they are.
    const zipFiles = files.filter(file => ['.zip', '.7z'].includes(path.extname(file)));
    // If it's a double zip, we don't need to repack.
    if (zipFiles.length > 0) {
        const instructions = zipFiles.map(file => {
            return {
                type: 'copy',
                source: file,
                destination: path.basename(file),
            }
        });
        return Promise.resolve({ instructions });
    }
    // The mod archive contains loose files, we need to repack it.
    else {
        // Create the 7zip instance - note this is using 'util' as imported from the 'vortex-api' module
        const szip = new util.SevenZip();

        // Define the name of the newly created archive and make sure it's placed inside the current destination path.
        const archiveName = path.basename(destinationPath, '.installing') + '.zip';
        const archivePath = path.join(destinationPath, archiveName);

        // Read the contents of the destination path (the extracted mod's root path). This does not have
        //  to be recursive unless you're planning on changing the structure of the archive.
        const rootRelPaths = await fs.readdirAsync(destinationPath);

        // Tell the 7zip module to add the files (and folders) we found in the mod's root directory. Note that
        //  we specify an optional 'raw' property. The Vortex 7zip module acts as a JS wrapper for the 7zip
        //  application, the 'raw' property simply adds the recursive switch '-r' as used with the 7zip command line
        //  interface; this tells 7zip to go through any directories recursively and maintain the folder structure it finds
        //  when adding the filepaths.
        await szip.add(archivePath, rootRelPaths.map(relPath => path.join(destinationPath, relPath)), { raw: ['-r'] });

        // The installer instructions should only copy over the archive we just created.
        const instructions = [{
            type: 'copy',
            source: archiveName,
            destination: path.basename(archivePath),
        }];
        return Promise.resolve({ instructions });
    }
}

// Conversion function from global promises to Bluebird promises.
function toBlue(func) {
  return (...args) => Bluebird.Promise.resolve(func(...args));
}

function main(context) {
  context.registerInstaller('doom-zip-mod', 25, toBlue(testZipContent), toBlue(installZipContent));
  return true;
}
To read more about available 7Zip operations, please visit the following github page.
You may have noticed that we’ve been using global promises in the installer; this is usually not straightforward as the installer registration expects Bluebird promises (at least at the time of writing this “guide”) to go around this limitation we used a very simple toBlue conversion function. This is not exported through the API - and it should be added to the game extension if you wish to use global promises with any of Vortex’s registration functions. Alternatively you could just avoid using global promises.
function toBlue(func) {
  return (...args) => Bluebird.resolve(func(...args));
}
Using the Nexus API
Usage
The Nexus Mods page contains a lot of information about mods that might be useful to extensions. It has to be noted though that not all information available on the page is also available through the API.
The core application maintains the network connection to the API meaning you don’t have to deal with that or low-level network errors, authentication and so on. It also means the core application can correctly monitor API limits and such. The drawback is that you can only access API functionality that Vortex exposes to extensions.
The easiest way to use API functionality is through the dynamic context.api.ext object, they are all prefixed with “nexus”, e.g.
const trending = await api.ext.nexusGetTrendingMods('fallout4');`
console.log('trending:', trending.mods);
Available functions
The concrete list of functions exposed in api.ext is not currently documented and might be extended in the future (but functions shouldn’t disappear), use the inspector/debugger to check what’s currently available.
Authentication
API functions require the user to be logged in, if they are not, these calls will trigger an exception that you can handle.
If you want to provide a better user experience, await api.ext.ensureLoggedIn() can be used to trigger a login if necessary. If the user is already logged in, this call will just return immediately.